Integrate your AwareGO account with your Azure AD in order to export all users (or only the users you specify) to AwareGO training portal.
Once set up, it will also remove and add users as they come and go from your Active Directory.
Which fields are imported from Azure AD to AwareGO?
For each group you have selected, we go recursively (if there is groups within groups) and gather the following properties for each employee. They are then put into the corresponding default fields in AwareGO’s platform.
- Group name
- Person displayName (Display Name)
- Person mail (Email)
After you integrate AwareGO with Azure AD:
- It will automatically update every 24hrs
- You can trigger the sync by clicking Sync Now on your settings page
- It will update account information such as name and email, add new users and remove old users
To get started, open your Windows Azure Management Console and follow these steps:
- On the top navigation pane, use the search box to find App Registrations

- Click the New Registration button
- Fill the appeared Register an application pop-up

- Give a name to your application, for example AwareGO AD connection
- Choose Accounts in this organizational directory only - the single tenant option
- Push the Register button
How to prepare your Azure AD for AwareGO integration:
- While in the App Registrations, copy and save the Application (client) ID on a notepad. You will need it later for the AwareGO integration page
- Copy your Directory (tenant) ID as well
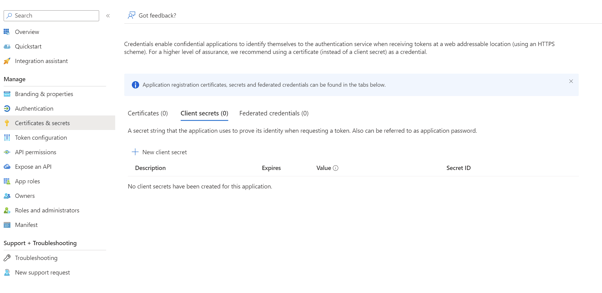
- Select the Application you previously created and click Certificates & Secrets in the list
- Add New client secret
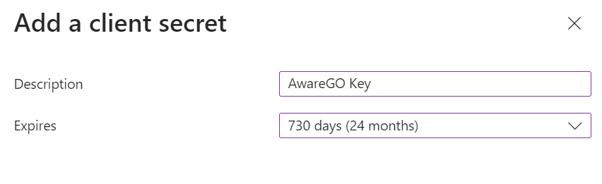
- Write AwareGO Key in the Description field
- Select an appropriate expiration period for your purposes
- Click Add
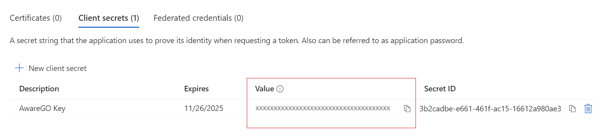
- An auto generated key will appear after you click Add, as in the image below
- Copy and save the key Value as you will need it along with the Application (client) ID. Note that you will not be able to copy this value again when you leave this page.
Permissions
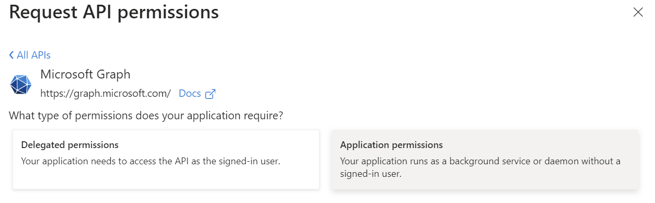
- Go to the API permissions section
- Click Add a permission and find Microsoft Graph in the list
By default, Microsoft Graph is granted "Sign in and read the user profile", do not remove it.
- Add the recommended permissions below:
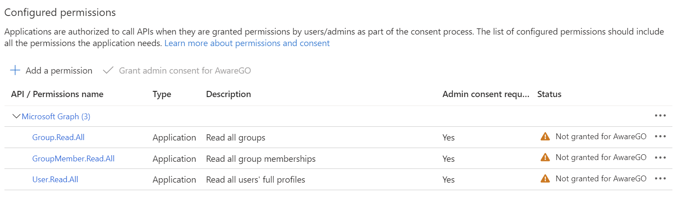
In the Application Permissions tab, check each of the following:
-
-
- Group.Read.All
- GroupMember.Read.All
- User.Read.All
-
Once all the permissions have been checked push the "Add permissions" button.
The permissions should now look like this:

Your permissions should now have green checkmarks:
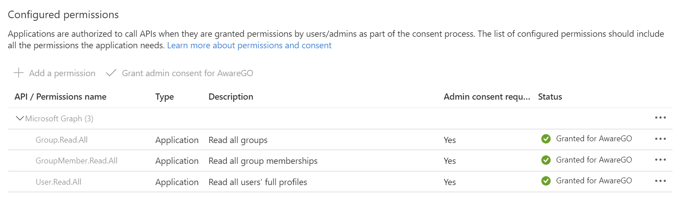
Now you have given AwareGO permission to read and import users from your Azure AD to AwareGO.
To complete the integration, you will need to update the credentials in AwareGO:
- Log in to your AwareGO account
- Go to Settings in the top right drop down
- Select Integrations
- Click Azure Active Directory
- Put in the Tenant ID, Client App ID, and Client secret from earlier
- Press the Connect Azure AD button
You can now select which groups to add to the AwareGO platform by pressing the Select Groups button.
You can then press the Sync Now button, and new lists will be created on the Employees page for the groups you selected.
If you need to add or remove groups at a later time, you can come back to this page and press the Select Groups button and make your changes. Press the Sync Now button to make the changes available right away.